Monday, May 12, 2014

Enable Printing Related Classes in SCCM 2012 and SQL Report

Enable Printing Related Classes in SCCM 2012 and SQL Report  :


There is a limited amount of network printer information available in SCCM 2012 and most of the information that is available is generally limited to local printer resources. Apparently this is because the SCCM client uses the user context “System” and therefore queries the HKEY_CURRENT_USER (HKCU) of “System” and not the HKCU of the user that is currently logged into the computer. So, for example, if you are looking for the default network printer that is selected by the local user, that information is a little harder to retrieve. Let’s look at the printer information that is relatively easy to come by before getting to the HKCU.
Before you can get the printer information you need to make sure that hardware inventory is enabled in the client settings and the printing classes are available in the hardware inventory classes.
Go to \Administration\Overview\Client Settings and click on properties for the Default Client Settings.
Printers and SCCM
Click on Hardware Inventory and then Set Classes
Hardware Classes SCCM
After the Hardware Inventory Classes screen comes up Click on Add
Set Printer Classes
This brings up the “Connect to Windows Management Instrumentation (WMI)”  dialog box.
SCCM Hardware Classes
In this case the classes would be loaded from the SCCM server that I am logged into. Since all of my clients are Windows 7, I would rather choose classes directly from a windows 7 box to be safe.
SCCM Hardware Classes
So enter a fully qualified domain name in the “Computer name” field, I left the WMI namespace the same, click “Recursive”, Credentials required since the computer is not local and type in credentials with administrative access, then “Connect”.
Hardware Classes for Printing
Now you will see all of the available classes, some will be marked “No” which means they are not enabled and the other will say “Yes” meaning that they are already available in theHardware Inventory Classes screen. There are allot of classes to look through, if you want to find the printing related classes just do a search from the “Search for inventory classes” search bar above.
Search Hardware Classes SCCM
As you can see all of the printing related classes say “Yes” and their associated boxes to the far left are grayed out which means I have already enabled these classes in the hardware inventory. If you’re print related classes say “No” the check boxes will be white so simply check the box and click ok.
Add Hardware Class Print
Now that you are back in the main “Hardware Inventory Classes” screen you will see theprinting classes available. Now you must check the boxes to include these classes in your hardware inventory. Now after a hardware inventory has been completed this information will be available through Resource Explorer , Queries and Reports. 


SQL Report :

select Distinct 
    PD.Name0, 
    count(*) 
from 
    dbo.v_GS_PRINTER_DEVICE PD 
Group by 
    PD.Name0 
Order by 
    PD.Name0


Count of Local Printers SQL Report


SQL :
select Distinct 
    PD.Name0, 
    count(*) 
from 
    dbo.v_GS_PRINTER_DEVICE PD 
Group by 
    PD.Name0 
Order by 
    PD.Name0
Count of PC within each OU SQL Report


SQL :

select
    ou.ou,
    count(*) as 'total'
from
    (SELECT sys.ResourceID, max(OU.System_OU_Name0) AS 'OU' FROM dbo.v_R_System AS sys INNER JOIN dbo.v_RA_System_SystemOUName AS ou ON sys.ResourceID = ou.ResourceID GROUP BY sys.ResourceID) ou
group by 
    ou.ou
Order by 
    ou.ou

Getting the OUs SQL Report


Getting the OUs

SELECT DISTINCT
 
dbo.v_GS_COMPUTER_SYSTEM.Name0, dbo.v_R_System.User_Name0, MAX(dbo.v_RA_System_SystemOUName.System_OU_Name0) AS Expr1,                      dbo.v_GS_COMPUTER_SYSTEM.Description0, dbo.v_GS_COMPUTER_SYSTEM.Manufacturer0, dbo.v_GS_COMPUTER_SYSTEM.Model0,             dbo.v_GS_PC_BIOS.SerialNumber0
 
FROM         dbo.v_GS_COMPUTER_SYSTEM INNER JOIN                      dbo.v_R_System ON dbo.v_GS_COMPUTER_SYSTEM.ResourceID = dbo.v_R_System.ResourceID INNER JOIN
 
                      dbo.v_RA_System_SystemOUName ON dbo.v_GS_COMPUTER_SYSTEM.ResourceID = dbo.v_RA_System_SystemOUName.ResourceID INNER JOIN
 
                      dbo.v_GS_PC_BIOS ON dbo.v_GS_COMPUTER_SYSTEM.ResourceID = dbo.v_GS_PC_BIOS.ResourceID
 
GROUP BY dbo.v_GS_COMPUTER_SYSTEM.Name0, dbo.v_R_System.User_Name0, dbo.v_GS_COMPUTER_SYSTEM.Description0,
 
                      dbo.v_GS_COMPUTER_SYSTEM.Manufacturer0, dbo.v_GS_COMPUTER_SYSTEM.Model0, dbo.v_GS_PC_BIOS.SerialNumber0


Getting the collection list
Select * from V_collection

SQl Report For Collect All missing Patches


SQL


select
      CS.Name0,
      CS.UserName0,
case
when (sum(case when UCS.status=2 then 1 else 0 end))>0 then ('Needs '+(cast(sum(case when UCS.status=2 then 1 else 0 end)as varchar(10))+ ' Patches'))
else 'Good Client'
end as 'Status',
      ws.lasthwscan as 'Last HW scan',
      FCM.collectionID--,
from
      v_UpdateComplianceStatus UCS
left outer join dbo.v_GS_COMPUTER_SYSTEM  CS on CS.ResourceID = UCS.ResourceID
join v_CICategories_All catall2 on catall2.CI_ID=UCS.CI_ID
join v_CategoryInfo catinfo2 on catall2.CategoryInstance_UniqueID = catinfo2.CategoryInstance_UniqueID and catinfo2.CategoryTypeName='UpdateClassification'
left join v_gs_workstation_status ws on ws.resourceid=CS.resourceid
left join v_fullcollectionmembership FCM on FCM.resourceid=CS.resourceid
Where
      UCS.Status = '2'
and FCM.collectionid = 'SMS00001'
Group by
      CS.Name0,
      CS.UserName0,
      ws.lasthwscan,
      FCM.collectionID
Order by
      CS.Name0,
      CS.UserName0,
      ws.lasthwscan,
      FCM.collectionID

Sunday, May 11, 2014

install new distribution Point


Note that you cannot enable PXE or Multicast support on your Windows 7 Distribution Point.


To troubleshoot your distribution point creation on the Windows 7 box, on your ConfigMgr site server, what does the distrmgr.log file tell you about the problem, if it's complaining about being unable to connect, then you could have firewall issues and/or wmi problems related to the fact that you have a firewall in place and/or IIS is not installed on the Windows 7 computer or doesn't have the following IIS features installed:

* IIS 6 WMI compatibility Feature
* IIS 6 Management compatibility feature

so verify the firewall settings, and then verify that you installed IIS on the Windows 7 computer..


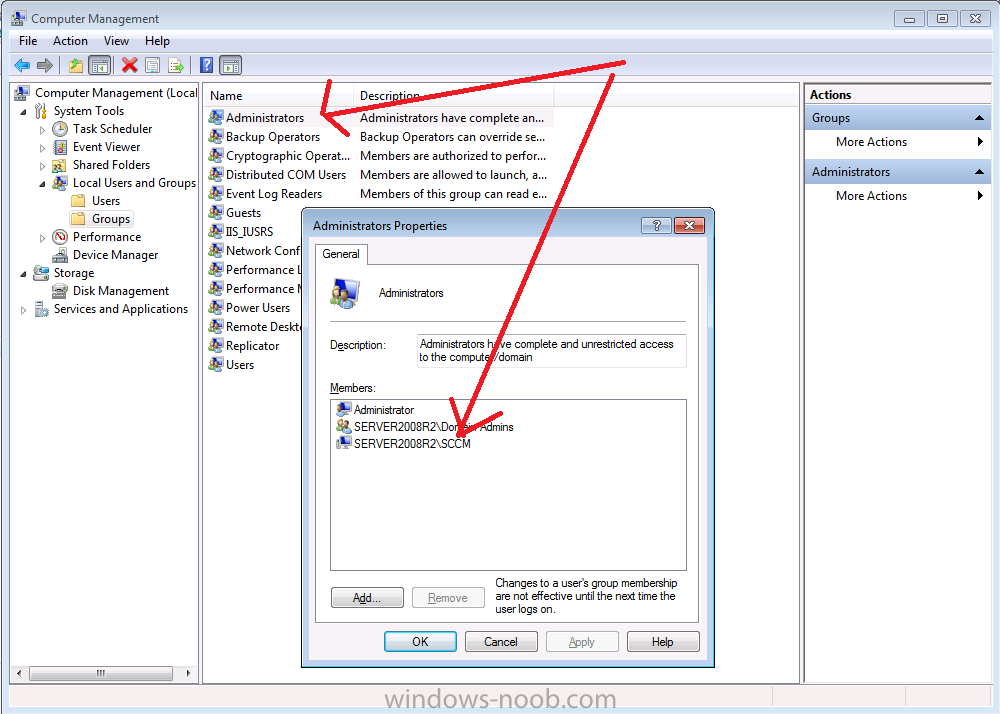
Next verify that you added the ConfigMgr site server computer account to the Local Administrators group on the windows 7 box. The screenshot below is from the Windows 7 computer. Once you've added the account to the Local Administrators group,

Note: You must reboot the Windows 7 box before installing the DP role otherwise IIS may not get installed automatically.

sccm server computer account.png

Installing the Distribution Point Role

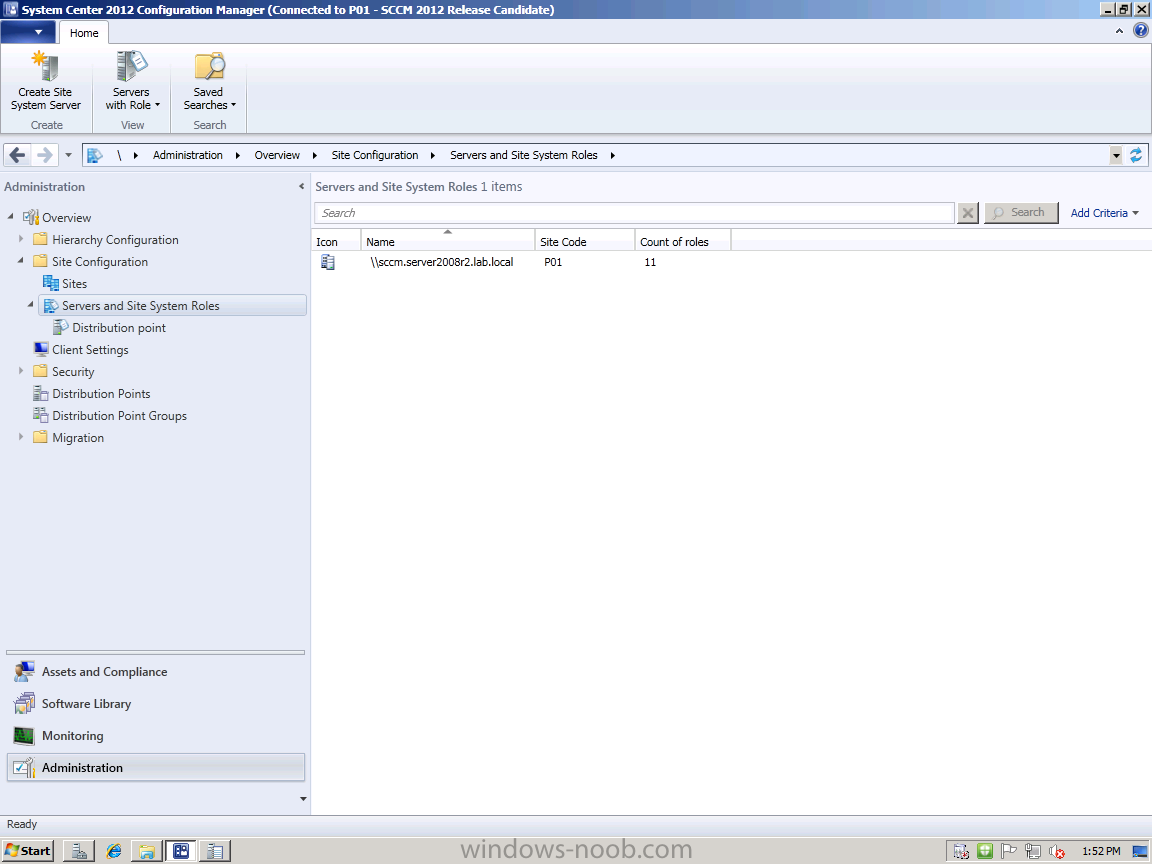
To start the installation of the Distribution Point role on the Windows 7 box, select Servers and Site System Roles from Site Configuration in the in the Administration part of the ConfigMgr Console.

servers and site system roles.png

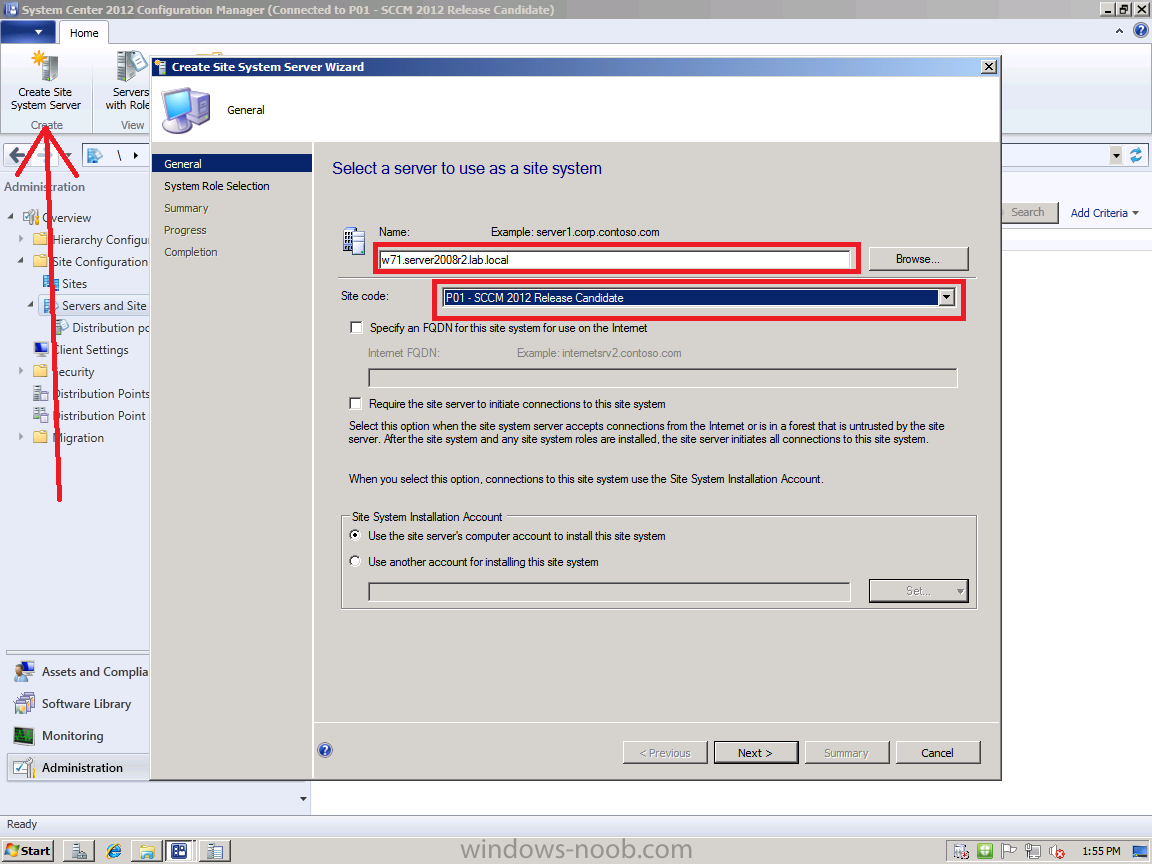
In the Ribbon, click on Create Site System Server, when the wizard appears, type in the FQDN of your Windows 7 computer and select your site code that it will be connected to from the drop down menu.

create site system server.png

For Site System Installation account you have the option of specifying a service account or the site server computer account, whichever one you use must be a member of the Local Administrators group on your Windows 7 computer. Click Next

Select Distribution Point from the list of available roles

dp selected in roles.png 

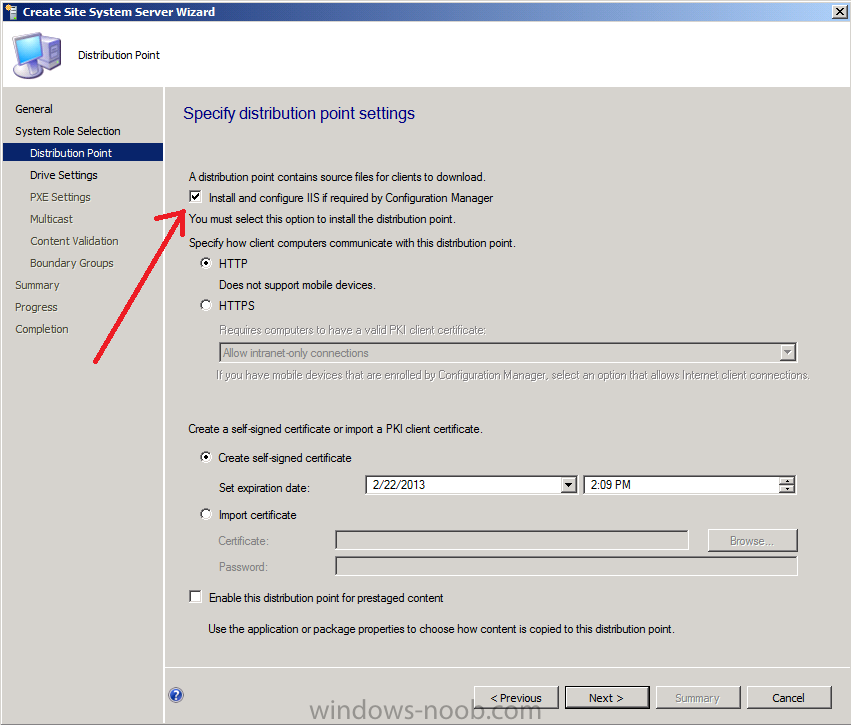
specify if you want IIS installed automatically or not (Install and configure IIS if required by Configuration Manager)

Install and configure IIS if required by Configuration Manager.png 

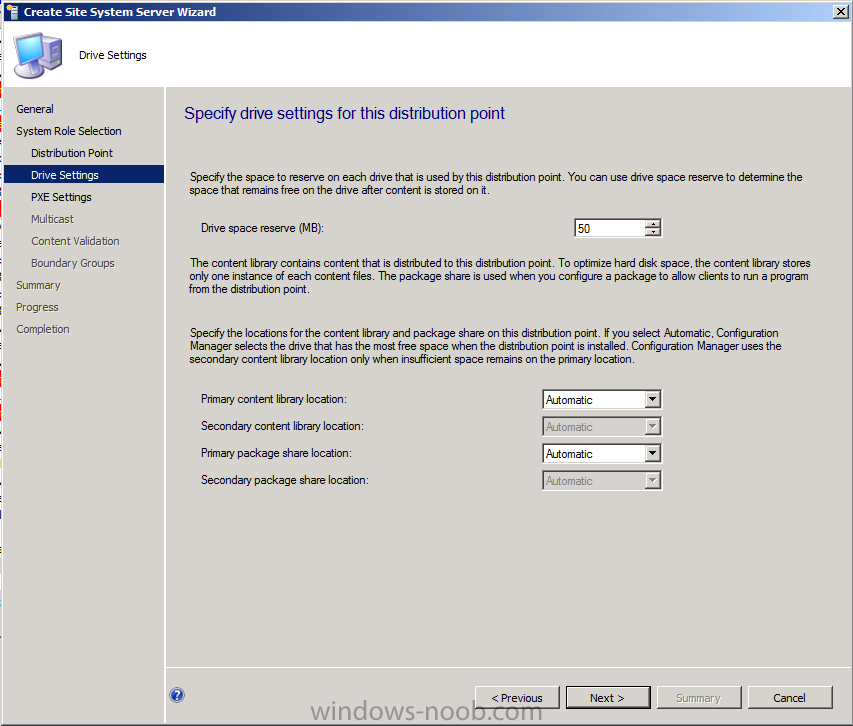
specify drive settings...

drive settings.png 

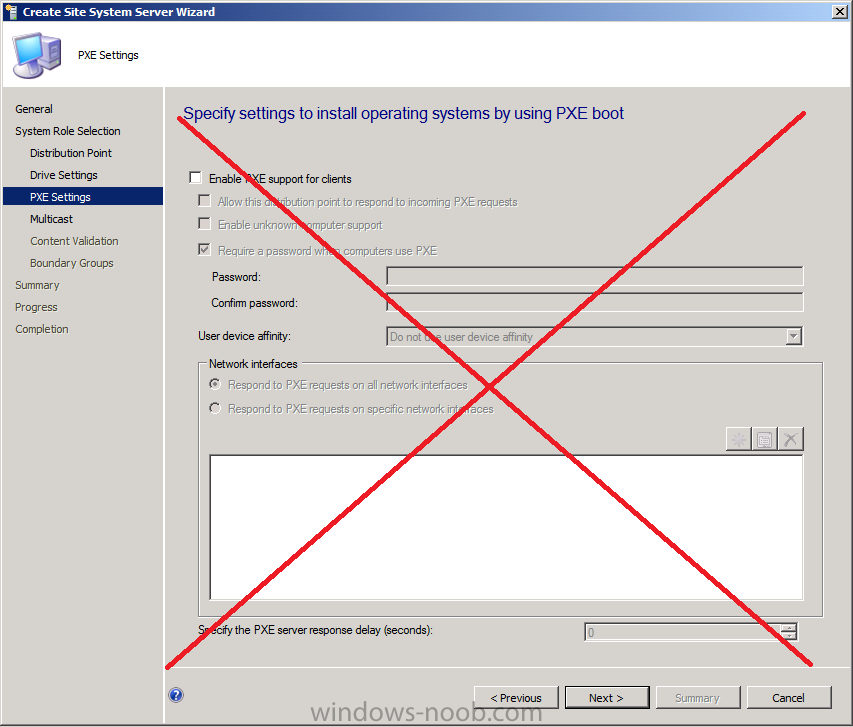
Do NOT enable PXE support (as this is a Windows 7 box and Windows Deployment Services is not available on Windows 7), just click Next

no pxe.png 

Do NOT enable Multicast (as above)

no multicast.png 

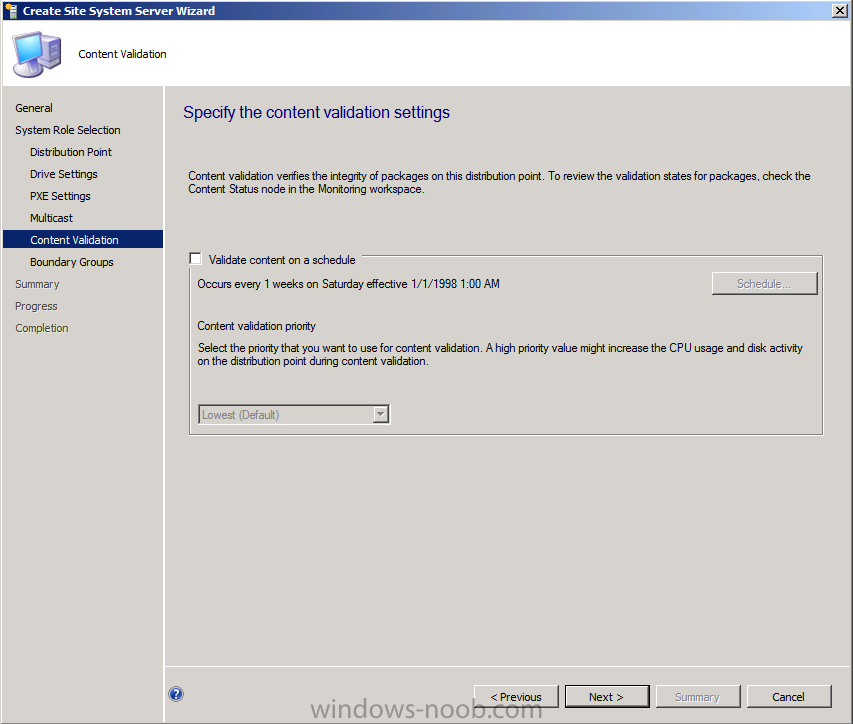
If you want to validate content on a schedule select the box, otherwise click next

content validation.png 

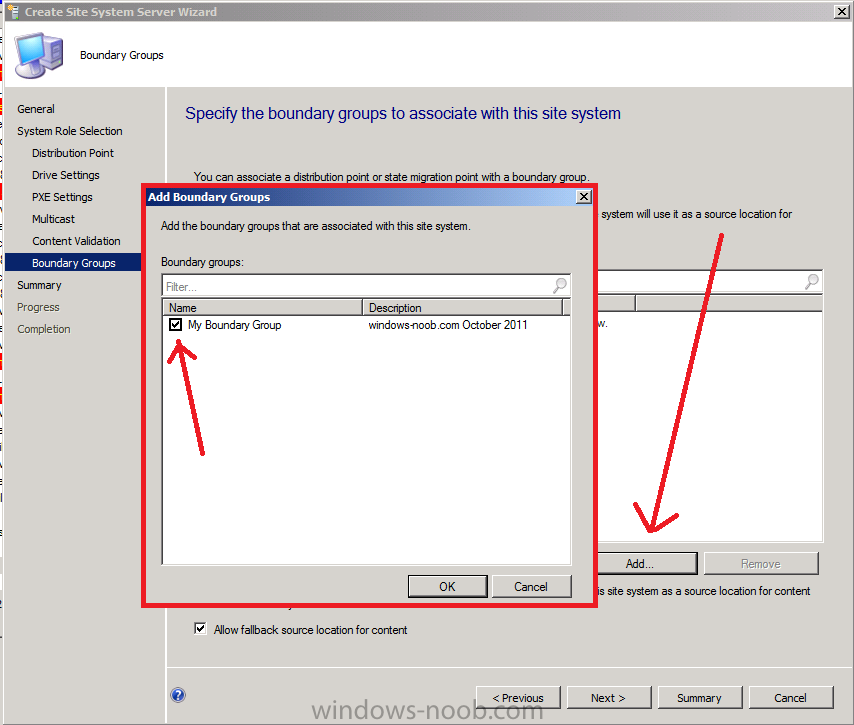
click next, then for Specify the Boundary Groups to associate with this Site System, click Add and select your boundary from those listed

my boundary group selected.png 

click next through to completion of the Wizard.


Monitoring the Distribution Point Role Installation

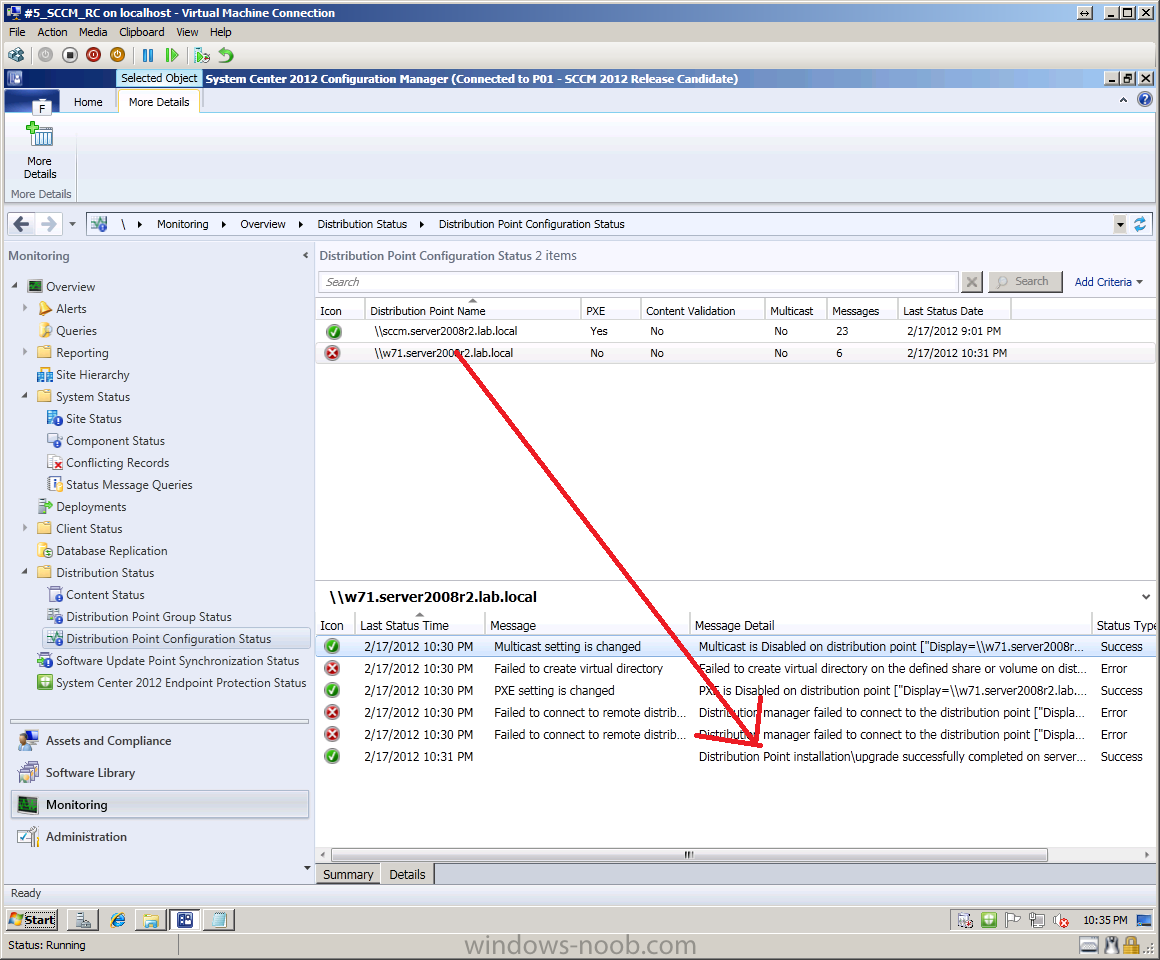
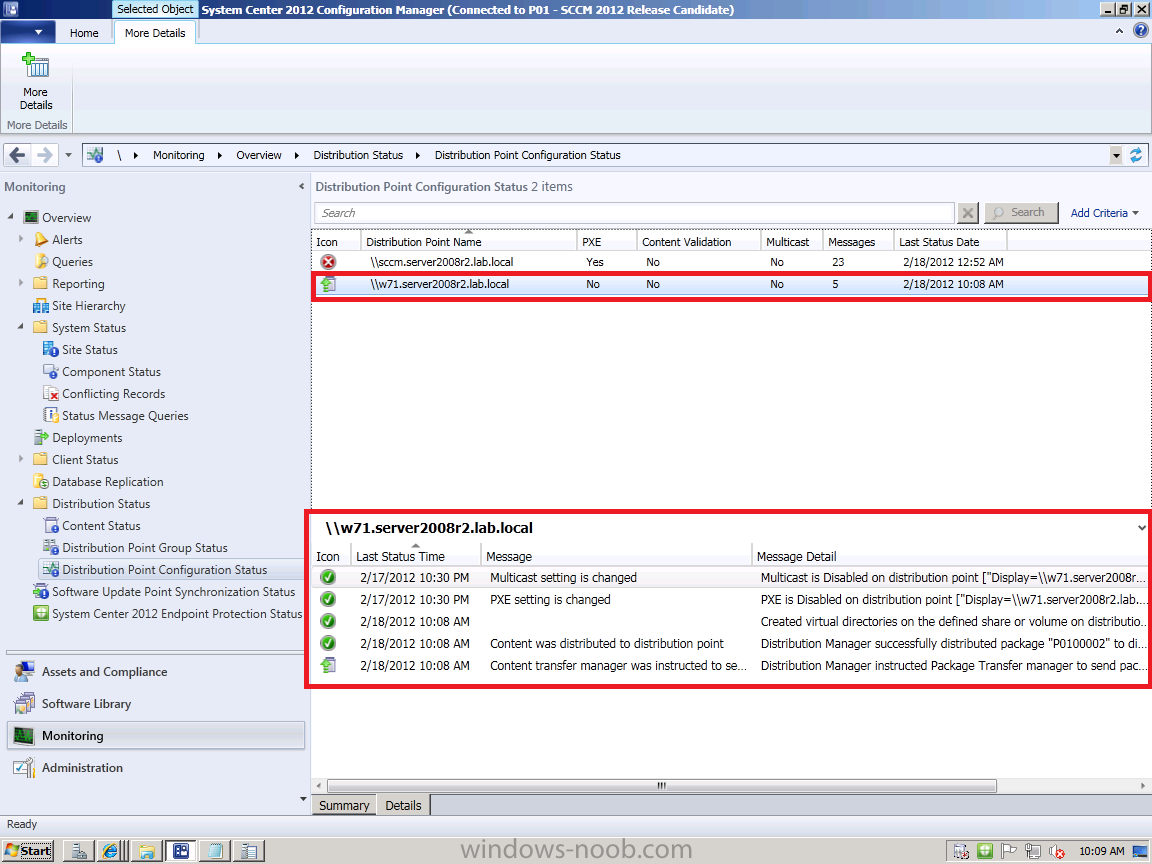
to see how your distribution point installation is progressing, you can monitor it in the ConfigMgr console, check the Distribution Point Configuration Status in Monitoring. Click on the machine name, then select the Details tab underneath, what does it say for your Windows 7 machine, you can even click on More Details in the ribbon to see if it provides more details about your issue.

w71 dp done.png

once it's done installing the Distribution Point role you'll see it reports it successfully and creates the needed folder structure on your windows 7 box.

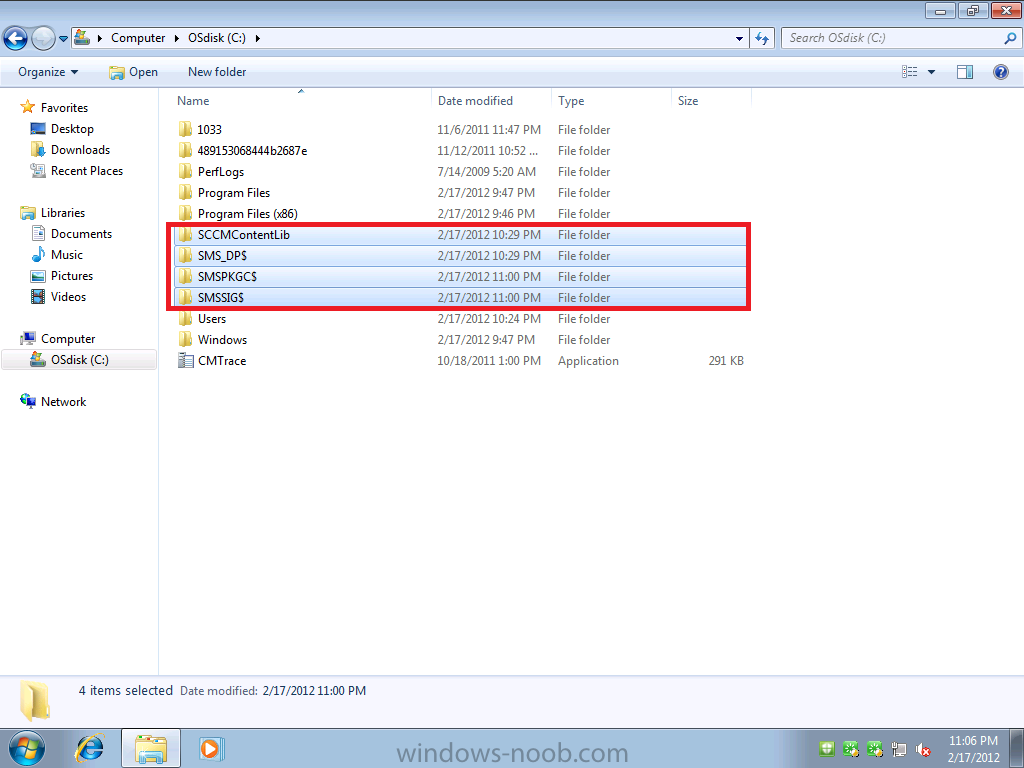
folders created on windows 7 machine.png

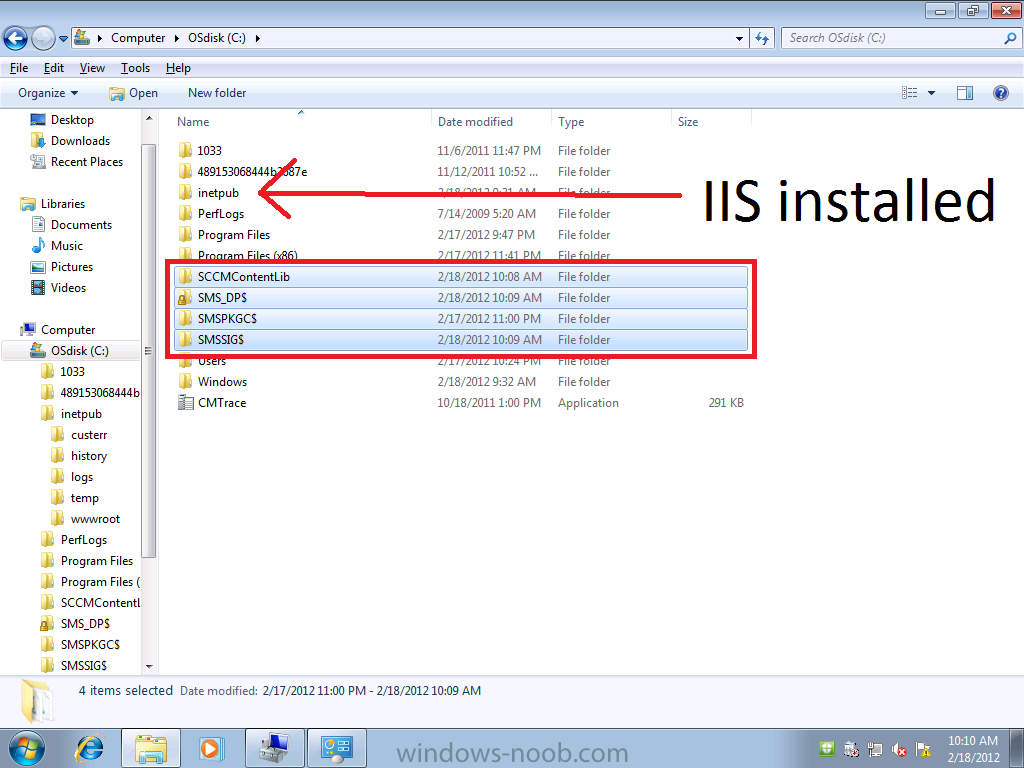
if you forgot to install IIS then install it on your Windows 7 box (you don't need to reinstall the distribution point role)

iis installed.png

once again, monitor the status of your dp again, it should refresh to all Green (ok) and finally, it's all done and working and content is being copied to your new distribution point.

dp installed successfully.png

Thursday, May 8, 2014

Error The State System message file processing processed one or more files that contained errors or invalid data. Review the statesys.log file for further details.

Error :The State System message file processing processed one or more files that contained errors or invalid data. Review the statesys.log file for further details.

The log file states that a specific computer's key is not in the database. Maybe the client record was aged out, or deleted manually. Thus, since there is no valid key for that client, the state system is not accepting the client's data.

What I'd do is to go to the client in question, and initiate a Discovery Data Collection Cycle, and see if that fixes the issue. I'd then go to the All Systems collection, update the collection membership, wait a minute or so, then refresh. I'd then look at the properties of this system. I'd then find the AgentName entry that says Heartbeat Discovery, and then use that same value (such as AgentName[0]) to verify the data is current - you'd use AgentTime[0] if AgentName was [0] for Heartbeat Discovery.